www.palbrick.com - www.palbrick.co.uk
Index - Type History -
B462772 -
Acknowledgements -
Links -
Contact
Preservation Archive: Part 1 -
Part 2 - Part 3 -
Part 4 - Part 5 -
Part 6 - Part 7 -
Part 8 - Part 9 -
Latest reports
Other Projects: 'Conflat A' B737695
B462772 'Palbrick B' - Preservation
For a general history of the 'Palbrick' wagons please refer to the
history page.
For more details of the history of this particular example, please
see Part 1 of the Preservation Archive.
For the purposes of this page it is sufficient to say that the wagon
was built in 1959, converted to a 'Freightliner Match Wagon' in 1967,
bought for preservation in late 2004 and is now undergoing a full
rebuild to original condition.
Restoration - Aims and Scope
My aim in preserving this wagon is to restore it to
as near as possible its original condition. In doing so, I am aware
that I am destroying a conversion which is itself now historic (and
arguably more successful than the original wagon!) and so my aim is
to carefully record the process so that there is, at least, a
detailed photographic record of the transformation.
Broadly the restoration can be divided into three parts: the removal
of the Freightliner modifications, the restoration of what remains of
the original wagon and the replacement of missing components. The scale
of the project will become apparent by reading the reports below, but
suffice to say that this is not a 'normal' wagon restoration project.
In many ways this is what makes it so interesting!
Preservation Archive:
As this page was becoming unwieldly, I have created a series of
archive pages for the older restoration reports. It has also been
suggested that I should have put the latest news at the top of this
page; all I can say is that it's a bit late now!
- Part 1 - January to April 2005
Arrival; removal of air pipes; initial dismantling of
Freightliner couplings.
- Part 2 - May to August 2005
Freightliner couplings continued; north end frame extensions;
surveying the 1967 modifications prior to removal.
- Part 3 - November 2005 to January 2006
Project delayed by saving 'family heirlooms'; DIY course in
oxy-propane cutting; Freightliner dragboxes; south end frame
extensions.
- Part 4 - February to April 2006
South end frame extensions continued; the continuing saga of the
Freightliner dragboxes; paint scraping exposes original lettering.
- Part 5 - May to August 2006
Final demise of the frame extensions and Freightliner dragboxes;
replica works plates cast; new vacuum cylinder sourced; various
brackets made; new steelwork prepared for original dragboxes.
- Part 6 - September 2006 to
February 2007
Underframe painting, dragbox rebuild and other bits of welding.
And an infestation of one spider. (Can you have an infestation
of one of something?)
- Part 7 - March to July 2007
More underframe painting, lots of rain, three months off, and
the fitting of the vacuum cylinder.
- Part 8 - August to December 2007
Yet more underframe painting, some bodywork painting (just for
variety), north end wheelset painting and brake cross-shaft
painting.
- Part 9 - December 2007 to August 2008
Brake rigging (there is lots of it), the continued painting of the
underframe, south end wheelset painting, and the purchase of some
very expensive drawings.
Recent Reports
Bodywork painting, part VI, 30-31/08/08.
| The majority of effort on the Saturday went into tracing as much
as possible of the original lettering, since all traces of this will
be obliterated soon but I intend to reproduce it as faithfully as
possible. For the most part this meant the solebar and the 'right hand'
end of the body, since I hadn't uncovered enough of the 'left hand'
lettering. |

Photo © P. Hetherington 30/08/08 |
Towards the end of Saturday I did a small amount of wire brushing
and priming, as seen on the uppermost photo to the right.
On Sunday I had intended to continue with the wire brushing and priming,
but the weather had other ideas - the small area I did do was done under
a plastic sheet, which was far from ideal. Still, it's a start. |


Both photos © P. Hetherington 31/08/08 |
Instead, the majority of the time was spent dabbing the remaining
blue paint with Nitromors in an attempt to sort out the original
lettering on the 'left hand' end. Although this was broadly successful,
I think the 'gentle heat' method used last year resulted in clearer
lettering showing through.
For the record, the original lettering shows quite clearly and reads:
16 T / B462772 / PALBRICK.B
However, look closely and you might just make out a second, later '16 T'
just below and to the left of the first one, a 'B' overlapping the '46',
and the remnant of '462772' overlapping and below 'PALBRICK B'. This
later (but fainter) lettering dates from the 1967 Freightliner conversion,
I believe, as the 'PALBRICK.B' name has been dispensed with. It is
interesting (and unusual) that the 'B' is on its own separate line, but
this explains why the '462772' appears (much clearer) on the east side
without a 'B' prefix. I will uncover the rest of the matching lettering on
the other side before obliterating it, just to be sure. |

Photo © P. Hetherington 31/08/08 |
Finally, I realised that the tare weight was missing from this lot,
so I had another look at the right hand end and found it in-between the
'W.B. 10'0"' and 'RETURN TO' text. It seems to be 7-11, i.e. 7 tons and
11 hundredweight, which agrees with the wagon diagram. The full text at
the right hand end reads:
XP / W.B. 10'0" / 7-11 / RETURN TO / DONNINGTON / L.M.R. |

Photo © P. Hetherington 31/08/08 |
Brake rigging, part XVI, 07/09/08, and bodywork painting,
part VII, 08/09/08.

Photo © P. Hetherington 07/09/08 |
On Saturday it rained a lot - no wagon work was attempted. On
Sunday it rained less, but often. Working on the wagon seemed
like a daft idea so I decided to tackle bits which could be
put away in the dry, i.e. some more bits of brake rigging. These
are the bits I need to re-fit the west side hand brake, and some
bits from the centre of the brake rigging which attach to the
adjustable link (which still needs cleaning up, though I made a
start). |

Photo © P. Hetherington 08/09/08 |
I hadn't planned on having a day off work on Monday - it's a long
story, but suffice to say that I found myself with a free morning,
and miraculously the sun came out. The primer I'd done last week
had suffered a bit in the rain, so I re-did bits of it as necessary
and carried on until most of that corner was in primer. I still
haven't gone over the lettering on the far side of the piece shown
though.
I also went over yesterday's bits with undercoat. |
Bodywork painting, part VIII, 13-14/09/08.
I dropped by on Saturday morning and put a coat of undercoat on last
week's primer, then on Sunday I wire brushed the lettering part of the
south-east end triangle, then got carried away and did most of the
south-west end triangle too. As I was running out of time I decided to
skip the fiddly bits at the top of the triangle, inside the side panel
slot, and around the sheet tie-down ring on the side, so I have these
still to do. The other areas were painted in primer, but inevitably I
ended up painting in the dark!
Bodywork painting, parts IX-X, and brake rigging, part XVII,
20-22/09/08.

Photo © P. Hetherington 22/09/08 |
Not much time on Saturday as I didn't get up from London until
about 3 o'clock, so not wanting to get too involved I picked the paint
bristles out of last week's primer (what comes of painting in the dark),
patched it up, waited a while and then put on some undercoat.
Unfortunately it must have been a bit cold overnight as the undercoat
has gone rather 'pinker' than usual; I think it'll be ok but I'll put
another coat on when I get a moment.
On Sunday the weather was perfect for wagon painting, but as always
the preparation took most of the time. I cleaned up and primed the
'fiddly bits' at the top of the south western end triangle, inside the
side panel slot and around the tie-down ring, then carried on and did
a bit more of the western kerb rail for good measure. |

Photo © P. Hetherington 22/09/08 |

Photo © P. Hetherington 22/09/08 |
I'd booked a day off on Monday and had intended to carry on with
the bodywork painting, but the weather had other ideas. Unfortunately
the rain didn't start until the rest of the western kerb rail and a
bit of the north western side panel slot were in bare metal, so I had
to keep wire-brushing them between rain showers until eventually I
reached a point when I was ready to prime them. This I did during a
break in the rain, but it started again before I'd finished so we'll
have to see what the damage is next time. |

Photo © P. Hetherington 22/09/08 |

Photo © P. Hetherington 22/09/08 |
That done, I beat a hasty retreat underneath the wagon and fitted
the two missing pins from the north and south bits of brake rigging,
then fitted a couple more brake rigging hangers. These two were among
the first bits to be removed back in October 2006 and after almost two
years in storage, they needed a bit of patching up as can be seen. I'll
need to get them back up to top coat before fitting the next two bits
which, incidentally, were painted in black gloss on Saturday evening.
In the dark...
Finally, it occurs to me that it's a while since I posted a photo of
the whole wagon, so here one is. |

Photo © P. Hetherington 22/09/08 |
Bodywork painting, part XI, and brake rigging, part XVIII,
04/10/08.

Photo © P. Hetherington 04/10/08 |
Heavy rain was forecast, but it actually mostly held off until
the evening so I had a better day than I'd dared hope for. I rubbed
down and re-primed the areas which had been rained on a fortnight ago,
then undercoated all of the areas of bodywork still in primer.
For good measure, I fitted three missing washers from the north end
brake rigging, and finally fitted the west side brake handle.
No, I have no idea what Shawn is doing... |
Bodywork painting, part XII, and brake rigging, part XIX,
25-26/10/08.

Photo © P. Hetherington 25/10/08 |

Photo © P. Hetherington 26/10/08 |

Photo © P. Hetherington 26/10/08 |
Saturday was wet - too wet to paint, anyway - so I didn't
achieve a great deal, but I did fit the last two brake rigging
safety loops, as well as touching up the black gloss on the two
pieces of brake rigging I fitted a month ago.
Sunday was a much nicer day, once the rain stopped, so I
finally got the bauxite gloss out and top-coated one
of the end triangles, and as you can see I made a start on the
opposite side. I'd have pushed on and done all of it, but the
temperature was dropping and it would have been at risk of ruining
the paint finish.
Bodywork painting, part XIII, 09/11/08.

Photo © P. Hetherington 09/11/08 |

Photo © P. Hetherington 09/11/08 |

Photo © P. Hetherington 09/11/08 |
The forecast was for rain, but it actually started out as rather a
nice day so I thought that a bit of priming would be fine, as the
primer dries pretty quickly. Of course, the weather tricked me - just
as I'd got one side of the next end triangle into bare metal, it
started raining... and it rained a lot. Cue a hastily lashed-up plastic
sheet which allowed me to get some primer on most of it. It then
stopped for long enough for me to remove the sheet and paint the top
surface... then it started raining again. So, the photos show what I
did, but how much of it will have to be re-done next time remains to
be seen.
Bodywork painting, part XIV, 22/11/08.

Photo © P. Hetherington 22/11/08 |
For once it stayed dry... but it was so near to freezing that
any slow-drying paint was out of the question, and with limited
time available all I managed to do was patch up and re-do the primer
which had been rained on last time (it wasn't too bad actually),
plus I finished preparing the side panel channel and the outer edge
of the end triangle, but I still have to do the other face of it. |
Bodywork painting, part XV, and brake rigging, part XX, 30/11/08.

Photo © P. Hetherington 30/11/08 |
The weather forecast for Sunday was for rain all day... just as well I
took no notice of it! Although it was generally gloomy and grey, the rain
held off apart from a few spots late on, and I actually had quite a
productive day. It was cold though, so I only dared use the quick-drying
primer. I wire brushed the 'inside' face of the north western triangular
body stanchion and also a small but fiddly area on the inside, where one
of the load clamping screws comes through the bodywork, then painted both
areas in primer. |

Photo © P. Hetherington 29/03/09 |
While the paint was drying, I looked around for another job to do and
decided to re-fit the last pair of vertical links from the brake rigging,
plus the long horizontal bar which connects the north and south ends
together. This leaves just the adjustable link (not yet painted) and the
western handbrake linkage to fit before the brake rigging is all
re-assembled, although there are a few split pins missing and I still have
to remove and paint the brake shoe hangers before it's done. |
Bodywork painting, part XVI, 06-07/12/08.

Photo © P. Hetherington 07/12/08 |
Saturday was a really nice day - bright, sunny and actually not
too cold either. Unfortunately I only drove up to Leicestershire on the
day so had limited time, but I managed to slap some undercoat over the
previously primed northwestern body triangle. Of course, I ended up
painting in the dark and there was a frost overnight, so it could have
been disastrous for the paint, but I must have just got away with it as
it didn't look too bad the following day. It needed another coat though,
which Emma did on the Sunday (thanks!) while I put some bauxite gloss
on the southwestern triangle. Unfortunately the cold got to the gloss
so it will need re-doing when the weather warms up - but the
whole wagon will need a second top coat in the spring anyway. |

Photo © P. Hetherington 07/12/08 |
Brake rigging, part XXI, 22/02/09.

Photo © P. Hetherington 22/02/09 |
You could be forgiven for thinking that nothing had happened since
late 2008; in fact you would be right, as it has simply been either too
cold or too wet to paint. I've been keeping busy on other GCR voluntary
activities and in fact spent most of this weekend on signalling/S&T
duties, but I also stopped by to do a bit on the Palbrick on the
Sunday.
One half of the (two-part) cross-shaft was fixed into position months
ago, the other had been hanging around for no particular reason so I
cleaned up the bits where the paint had suffered from it being slid
to-and-fro within its mountings, greased the bearing surfaces and
fixed it into position.
Next job was to properly fix the brake handles in place, having
finally acquired some large split pins in proper imperial sizes. I was
going to fit the vertical link between the handle and the cross-shaft
too, but the picture shows how far I got - I stopped because I'm short
of one of the smaller split pins which go through the two pins in this
link. Still, that's an easy job to do another day. |
Bodywork painting, parts XVII-XVIII, 28/02/09-01/03/09.

Photo © P. Hetherington 01/03/09 |
A surprisingly nice weekend for the time of year, so time to get
on with the bodywork. Basically everything you can see in yellow
primer was wire-brushed and primed over the weekend - quite a good
session, really. Hopefully the weather will be kind and I can get some
undercoat on these areas soon as I don't like leaving it in primer for
too long.
Meanwhile, by way of a snippet of useful information, I recently obtained
a list of BR's 4-digit location codes, so I can now decipher the Palbrick's
1988 'general repaired' plate. This comes from location 5459, which is
Doncaster, and I suspect that this is where the blue paint was applied.
The plate also carries '123' with the '4' having been ground off; I
believe this means the work was carried out in the last quarter of that
year. This plate will not be going back on the wagon in its un-rebuilt
state! |

Photo © P. Hetherington 01/03/09 |
Bodywork painting, parts XIX-XX, 15-16/03/09.

Photo © P. Hetherington 15/03/09
On 7th March I took the top layer or two of paint off the last
bodyside 'triangle', to check that the original text was the same
as on the other side. It was, save for some slight differences in
positioning which probably don't really matter, though I did add
some notes to my earlier tracing. |

Photo © P. Hetherington 15/03/09
On Sunday March 15th I resumed the task of preparing and priming the
Palbrick's bodywork, starting with the 'inside' face of the
aforementioned triangular end stanchion... |

Photo © P. Hetherington 15/03/09
...before continuing with the 'outer' face, of which I'd already
done the 'fiddly bits' around the edges a couple of weeks
previously. |

Photo © P. Hetherington 16/03/09
I took a day off work on Monday to continue the painting, but the
first task was to clean up and prime the bar across the top of the
load-tensioning end. I also did the two lock-nuts for good
measure. |

Photo © P. Hetherington 16/03/09
Next job was to get the undercoat out, following which everything
still in primer was undercoated. Although I say so myself, it's
starting to look rather good! |

Photo © P. Hetherington 16/03/09
Apart from the lower two lock-nuts, the load-clamping bars are now
the last parts still in blue. The rest would have gone into bauxite
top coat on the Tuesday, but the weather had other ideas. Soon,
though!
|
Bodywork painting, part XXI, 29/03/09.
The weather forecast wasn't too promising but it actually turned out
to be a really nice day, so I decided to some top-coating. First, though,
one of the kerb rails needed some remedial work as, after spending the
winter in undercoat, the damp had got to it and rust was starting to
come through. I wire brushed the affected area and primed it, you can
just see this to the right of the left hand photograph.
The rest of the day was spent painting the load-tensioning end of
the wagon in bauxite. This only leaves the two kerb rails, plus one
quarter of the south end of the wagon where the paint got frost
damaged after I painted it, plus the load-tensioning bars which are
still in blue of course... then I'll think about another coat.

Photo © P. Hetherington 29/03/09 |

Photo © P. Hetherington 29/03/09 |

Photo © P. Hetherington 29/03/09 |
Bodywork painting, part XXII, and brake rigging, part XXII,
13/04/09.

Photo © P. Hetherington 13/04/09 |
The Easter break was almost a complete wash-out as far as wagon
work was concerned; only the Monday was dry, and by this time I
had got stuck into GCR S&T duties so decided to finish what
I'd started... however I did do a little bit on the Palbrick in
the afternoon, including undercoating the part of the kerb rail
which I'd left in primer.
I then decided to remove most of the brake shoes and their hangers
from one side of the wagon; I can clean these up away from the GCR
and bring them back for painting, and meanwhile I can paint the
bits of wagon which were previously inaccessible. One brake shoe is
seized to its mounting though, which is why it's still there in the
photo. I'm not yet sure how to get this off without breaking it... |

Photo © P. Hetherington 13/04/09 |
Bodywork painting, parts XXIII & XXIV, and brake rigging, part
XXIII, 19-20/04/09.

Photo © P. Hetherington 19/04/09 |
The main job this Sunday was the de-rusting and priming of the
upper load tensioning bar. This turned out to be surprisingly
fiddly because of the way it clamps to the screws; ideally I'd
have removed it for painting but it's virtually impossible to do
so because the securing nuts behind the holes are held with split
pins which are so corroded that they would need to be sawn off,
which is impossible due to the awkward access. So I've just had
to clean up and prime these areas as best I can.
Towards the end of the day I made a start on cleaning up and
priming the first of the brake shoe mountings. |

Photo © P. Hetherington 19/04/09 |

Photo © P. Hetherington 20/04/09 |
I'd booked Monday off work, and what fantastic painting
weather! I spent most of the day cleaning up the lower load
tensioning bar, access to which is even more awkward than the upper
one, and also the two locknuts behind. I believe that's the last of
the blue paint gone...
Next job was to prime the lower load tensioning bar to match the
upper one, but before I did that I decided to top-coat the kerb
rail on the west side of the wagon. I ended up priming in the
dark again, so I'm fully expecting to have to touch it up a bit
on my next visit.
Finally, I cleaned up two more of the brake shoe mountings, though
I still haven't managed to shift the fourth brake shoe on the east
side which is seized to its mounting, despite several doses of
penetrating spray. |

Photo © P. Hetherington 20/04/09 |
Springs and axleboxes, part I, 24/05/09

Photo © P. Hetherington 08/06/09 |
I've only had limited time available over the last few weeks, so
progress has been rather slower than i'd like. On the Sunday of the
Bank Holiday weekend the weather was glorious, so I decided to make
a start on one of the spring/axlebox areas (the north-east one, in
fact). This turned out to be extremely fiddly - no surprise there -
so I reached a point where I had to put some primer on, which I did,
but the fiddly areas are not all finished and it will be at least
three weeks (probably) before I can carry on.
For good measure I did finally manage to shift that stuck brake
shoe. After several doses of penetrating spray over a few weeks 'all'
that was needed to get it to turn was a bolt through the holes, a
crowbar under the bolt and a lot of brute force. And even after it had
been turned slightly, it had to be hammered all the way off. Carefully,
of course, since I was wary of breaking the cast iron.
I should also mention that, over the last month, the odd hour here
and there has been spent cleaning up the brake shoes and hangers
already removed, such that some of them are now in primer. |
Springs and axleboxes, part II, 08/06/09

Photo © P. Hetherington 08/06/09 |
A day off work, although I very nearly cancelled it after the
appalling weekend washout and the unsettled forecast. in the event
it was a pretty good day for painting!
The first job - which took most of the day - was to complete the
wire brushing and priming of the 'fiddly bits' of the northeast
spring and axlebox area. All of this is now in primer, except the
axlebox cover (which will have to come off yet) and the tie bar
across the bottom of the W-irons, which I removed for painting but
haven't cleaned up yet. |

Photo © P. Hetherington 08/06/09 |
That done, I ended the day by undercoating the load clamping bars,
at which point I ran out of the pinkish coloured undercoat. |
Springs and axleboxes, part III, 21/06/09
| Most of the day was spent wire-brushing and priming the W-iron
and spring in the south-east corner of the wagon. Another day will
be needed to do the axlebox itself. |

Photo © P. Hetherington 21/06/09 |
I also top-coated most of the remaining kerb rail on the east side,
apart from a few areas where the primer/undercoat needed touching up
due to standing in undercoat for so long.
Meanwhile, most of the fittings removed from the east side of the
wagon have now been wire-brushed in odd evenings at home and await
priming, with just one brake shoe and a few split pins still in the
queue. Once these are done I can start thinking about the other
side... |

Photo © P. Hetherington 21/06/09 |
Springs and axleboxes, part IV, 30/06/09
| It was too hot! Most of the day was spent wire-brushing and priming
the south-east axlebox and the lower part of the W-iron, and touching
up a few areas which had been missed the last time around. Also, some
more of the removed brake shoes and hangers, which had been
wire-brushed at home, were painted with primer. |

Photo © P. Hetherington 04/07/09 |
| That done, I finally got around to re-top-coating the southwestern
triangular body stanchion, the previous coat of paint on which had
suffered frost damage after being painted in December... I would have
top-coated the load clamping bars too, but I ran out of time. |

Photo © P. Hetherington 30/06/09 |
Springs and axleboxes, part V, 04/07/09

Photo © P. Hetherington 04/07/09 |
I only had a couple of spare hours this weekend but, armed with a
new tin of paint, I managed to undercoat most of the northeastern spring
and axlebox, with just the fiddly bits plus a couple of places the
primer had missed requiring further attention.
Incidentally I really must thank Shawn (aided and abetted by Amy, or was
it the other way around?) for an un-birthday present in the form of an LP
of 'Paint Your Wagon', wrapped up in Thomas the Tank Engine paper! ;-) |
Springs and axleboxes, part VI, and bodywork painting, part XXV,
10/07/09

Photo © P. Hetherington 10/07/09 |
I'd planned a day with rather less wire brushing, in order to clear
some of the backlog of painting. The first job was to clean up the brake
handle guide (with all its fiddly holes) on the west side of the wagon,
and by extension a small area of the W-iron. This threw up a problem as
shown in the left hand photograph - one of the strips which the axlebox
slides against is lifting off due to a build up of rust behind which has
caused the weld to break. We'll probably need to jack the wagon up off
its wheels to re-weld this, but that can be done later - for the time
being I just primed it anyway. |

Photo © P. Hetherington 10/07/09 |

Photo © P. Hetherington 10/07/09 |
Next it was time to undercoat the springs, axleboxes and brake
hangers on the other side of the wagon. First I'd sorted out any small
areas that the primer had missed on the north east wheelset (the far
one in the left hand photograph), then patched up the grey undercoat
where necessary. Then I carried on and undercoated the south east
wheelset - although once again I found areas that the primer had missed,
particularly on the back, so there is some more work to do on this one.
By the time I'd done all of that the brake handle guide on the other
side was ready for undercoat (the primer dries quickly) so that got
done too. |

Photo © P. Hetherington 10/07/09 |

Photo © P. Hetherington 10/07/09 |
I also undercoated the various brake shoes and hangers which were
previously primed - and the next evening I popped down and primed
another shoe and hanger, so there is now only one brake shoe currently
sitting in my garden shed waiting for cleaning up.
Somewhere along the way I also painted the load-clamping bars in bauxite
top coat. Everything above solebar level has now received one coat of
gloss; once I've stopped making dust 'down below' I'll give the wagon a
good clean and a second coat, before thinking about lettering. |

Photo © P. Hetherington 10/07/09 |
Springs and axleboxes, part VII, 25/07/09

Photo © P. Hetherington 08/08/09 |
A day of limited progress, really. I removed the brake shoes and
hangers from the south-west wheel, wire-brushed and primed the mounting
points for the hangers and shoes, and patched up the primer on the back
of the W-iron of the south-east wheel. I then opened a new tin of black
gloss and painted most of the north-east W-iron and axlebox, although
not all of it - I ran out of time before I could finish.
Meanwhile, back at home, another brake shoe and holder has been wire
brushed and is ready for priming - that's the last one for the east
side. |
Springs and axleboxes, parts VIII-X, and brake rigging, part XXIV,
07-09/08/09

Photo © P. Hetherington 08/08/09 |
With a day off work plus a full weekend of good weather, I had the
opportunity to make some good progress - although, inevitably, I didn't
get everything done which I'd hoped to.
On Friday most of the time was spent wire brushing and priming the lower
(easier) part of the W-iron for the south-west wheelset, including most
of the axlebox casting. There is an issue with this axlebox; as mentioned
previously, where it slides up and down in the guides the metal strips
on the guides have started to lift off due to a build-up of rust behind.
Fixing this probably involves taking the wheelset out so I'm hoping it
isn't bad enough to need doing (there is still some lateral movement)
and, for now, am just painting it regardless.
I also primed the last of the brake shoes, hangers and tie-bar off the
eastern side of the wagon |

Photo © P. Hetherington 08/08/09 |
On Saturday I wire-brushed and primed the rest of the south-western
W-iron, including the spring. This spring is quite tight against the
W-iron and my attempts to paint around the back have involved trying to
paint with a toothbrush - it isn't ideal, nobody will ever see it of
course but I want to keep the rust at bay! |

Photo © P. Hetherington 09/08/09 |
On Sunday I decided to do rather less preparing and rather more
painting, or at least that was the idea. But then I remembered the
adjustable link out of the brake rigging, which has been sitting
around waiting for attention for months while the brake rigging on
the wagon is held together with string. Wire brushing this wasn't
much of a problem (although fiddly with all of the holes); the issue
was that rust has built up between the two plates of this piece, which
are rivetted together, forcing them to bulge outwards between the
rivets. My previous attempt to clean out the rust with a hammer and
chisel or a hacksaw hadn't achieved much, so I resorted to drastic
measures and melted the rust out with the oxy-propane burning
gear. Believe it or not, this worked, fortunately with no damage to
the steel, and I ended the day by priming this piece, making sure that
plenty of primer got in the gap where I'd burned off any lingering
rust protection that might once have been there. Once I've finished
painting it I'll stick in some oil (waxoyl maybe) for good
measure. |

Photo © P. Hetherington 09/08/09 |
The rest of the day was spent painting various bits with various
paints - some touching-up of primer here and there (wagon springs
mainly, but also the two W-irons at the south end in a couple of
places), some top-coat black gloss on the back of the W-irons and so
on around the north-east wheel, and in odd places on the two south-end
wheels, and some grey on a lot of the areas previously painted in
yellow primer - though I ended up undercoating in the dark, so I daresay
another coat will be needed in a few places. |
Springs and axleboxes, part XI, 23/08/09

Photo © P. Hetherington 23/08/09 |
Little to see, but most of the grey areas on the wagon received a
second coat where needed, the back of the north-east spring was painted
(with a toothbrush!) in primer and then undercoat, as it had been missed
previously, and an increasing pile of loose parts went from primer to
undercoat. This pile now includes all but one of the brake parts from the
south-west wheel too, although those are only in primer at this stage.
That last part has been wire-brushed (at home) since the weekend. I had
to straighten the tie-bar off the south-west wheel as it had somehow got
bent downwards during the wagon's life, and was thus too tight a
fit. |
Springs and axleboxes, part XII, 31/08/09
I stopped by for a couple of hours on Saturday to put the next
layer of paint on a few loose bits of brake rigging, but then
disaster struck as the shelving I've heen hanging bits on decided
to give way and a load of freshly-painted bits slid off onto the
floor! Oops...
So, much of Monday was spent repairing the damage. with various
chips, scratches and embedded bits of stuff removed from the paint,
and the offending parts patch-primed as required.
Once that was done I decided to carry on with the wagon itself,
so I wire-brushed and primed the 'top half' of the W-iron and all
of the spring for the north-west wheel.
That done, I got the black gloss out and just-about-finished both
of the W-iron/spring/axlebox areas on the east side of the wagon,
with just a small area on the back of one W-iron (which the
undercoat had missed for some reason) needing further attention,
plus very probably the areas behind the springs. I would have done
the south-west one too, but ran out of daylight. |

Photo © P. Hetherington 11/09/09 |
Springs and axleboxes, parts XIII-XVI, 11-14/09/09
A concerted effort over four days saw the black gloss on the
three most advanced spring/axlebox areas virtually finished, with
just some touching up on the back of one spring and W-iron to
finish. All of the brake shoes and hangers for these three wheels
were also completed up to top coat, so they should be ready to go
back on next time.
The brake shoes and hangers were removed from the remaining
(north-west) wheel and the axlebox and the remainder of the W-iron
were wire brushed and primed, following which the whole area was
undercoated and about two-thirds of it painted in gloss black, with
some fiddly bits (mainly on the back) still to do.
All things considered, a worthwhile few days which has moved the
project along nicely.

The east side running gear.
Photo © P. Hetherington 11/09/09 |

The north-west wheel in undercoat...
Photo © P. Hetherington 14/09/09 |

...And (mostly) in top coat.
Photo © P. Hetherington 14/09/09 |
Springs and axleboxes, part XVII-XVIII, 27-28/09/09
| I had about half a day free on Sunday and spent the time
finishing the painting around the north-west spring, axlebox
and W-iron, plus a bit of touching up as required on the others,
and on the various 'loose bits'. The W-iron strap for the
north-western wheel also got wire brushed, primed and
undercoated. |

Photo © P. Hetherington 01/01/10 |
| On Monday I started to re-fit some of the brake shoe hangers
and holders - by the end of the day all of those for the south
end wheelset were on, awaiting brake shoes, and the hangers for
the north-east wheel were on too. Those for the north-west wheel
are still in a rusty state in my shed... |

Photo © P. Hetherington 03/10/09 |
Brake rigging, parts XXII-XXIII, 03-04/10/09
| With the nights drawing in, opportunities to wire brush the
remaining brake rigging bits in mid-week evenings are now limited,
so I rescued the brake shoes, holders & hangers for the north-west
wheel from my shed and spent Saturday at the GCR wire-brushing and
priming them. By Sunday they were undercoated too. There is, however,
a problem - one of the brake shoe holders has a crack between the
large spindle hole and the outside, so it either needs repairing
(difficult, apparently) or replacing. I don't have any spares so
I might need to 'borrow' one from my Conflat, B737695, for the time
being. We'll see. |

Photo © P. Hetherington 01/01/10 |
On Sunday I re-fitted the brake shoe holders for the north-east
wheel, and the brake shoes to that plus both of the south end wheels,
so the Palbrick now has six of its eight brake shoes fitted. I also
fitted most of the remaining washers and split pins to the brake
rigging - a job which has been hanging around for ages - with just
the adjustable link needed now to make the handbrake work again. |
Brake Rigging, part XXIV, 31/10/09 and 08/11/09.

Photo © P. Hetherington 01/01/10 |
Progress has been somewhat limited due to a combination of not
being here and the weather now being a bit too damp or cold or both
to achieve much. However, most of the brake rigging parts for the
north-western wheel have reached the top coat stage, and three new
bolts (replacing some of the wrong type) have been cut to length
and drilled for split pins, for the axleguard tie-bars. Also the
non-bearing surfaces of the bolts supporting the brake shoe hangers
and holders, for the other three wheels, have been primed in situ,
and a start has been made on patching up areas of the safety loops
which had got scratched while the brake shoe hangers were off the
wagon. |
Brake Rigging, part XXV, 17/01/10.

Photo © P. Hetherington 16/01/10 |
The weather (and other priorities) continue to hamper progress,
but some smaller parts are being worked on at home, as time permits.
For example, the 'swan necks' for the vacuum pipes are now in red
top-coat.
The missing links from the brake rigging, which connect the vacuum
cylinder to the cross-shaft, have been manufactured from scratch;
thanks must go to the RVP Travelling Post Office team for organising
this for me. These have been primed, undercoated and painted in black
gloss.
As the 17th was unseasonably warm and sunny (welcome respite from the
several weeks of sub-zero temperatures and snow we've been having!),
I took the opportunity to undercoat the various shoe hanger bolts
which had been left in primer.
At long last, some news on the side stanchions. Dave Turnock is making
these for me, but you may recall that there was a problem in obtaining
the correct steel channel. The original specification called for 5"
channel with a 2.5" flange and 0.25" web, but this is no longer made
in the UK (or seemingly anywhere). Dave managed to locate some (possibly
salvaged from an industrial structure which was being demolished,
I'm not entirely sure) but the lengths were insufficient. To resolve
this he's had four pieces welded together to produce two pieces of
the required length. The photo shows the result - I'm very pleased
with the standard of welding, done by one of Dave's colleagues I
believe. The next step is to cut the webs down to the correct depth
and to make and weld in the strengthening ribs. Watch this space!
Finally, Dave has also supplied the 'sock' or 'sleeve' which goes over
the shaft of the vacuum cylinder. |

Photo © P. Hetherington 16/01/10 |
To Do:
The wagon has now reached a point where it 'only' needs final
painting, vacuum pipe, side stanchions and woodwork, plus the
re-assembly of various smaller parts (including the remaining brake
rigging). The list of jobs is definitely getting shorter! These
photographs give a flavour of the tasks which lie ahead:
 |
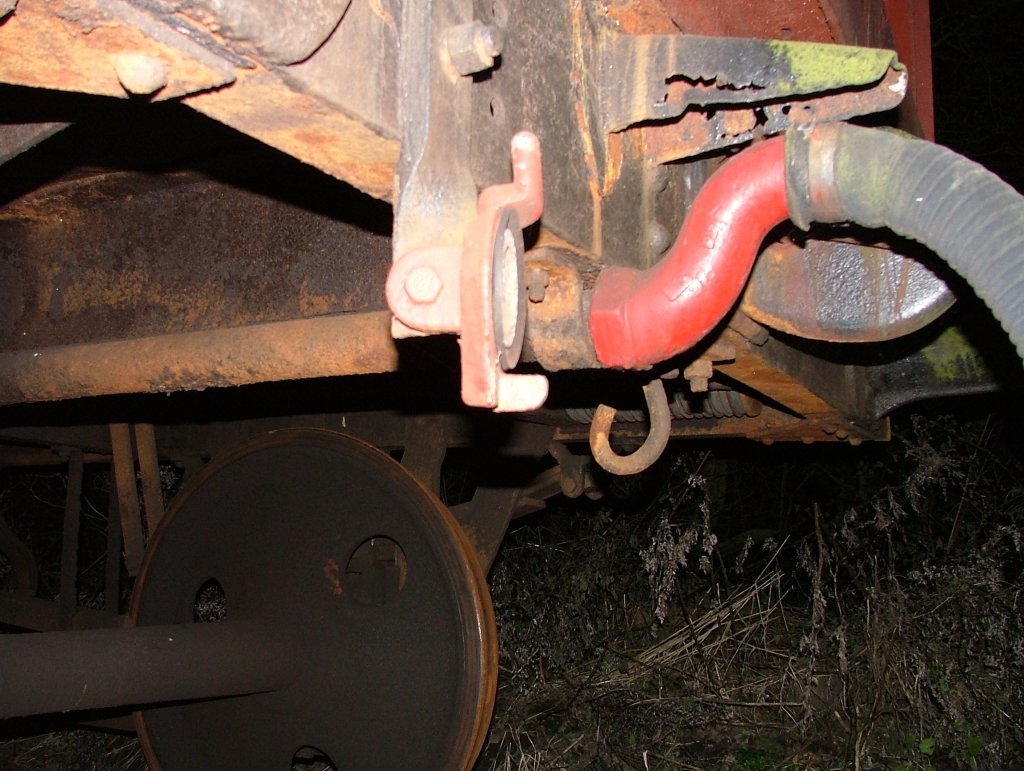
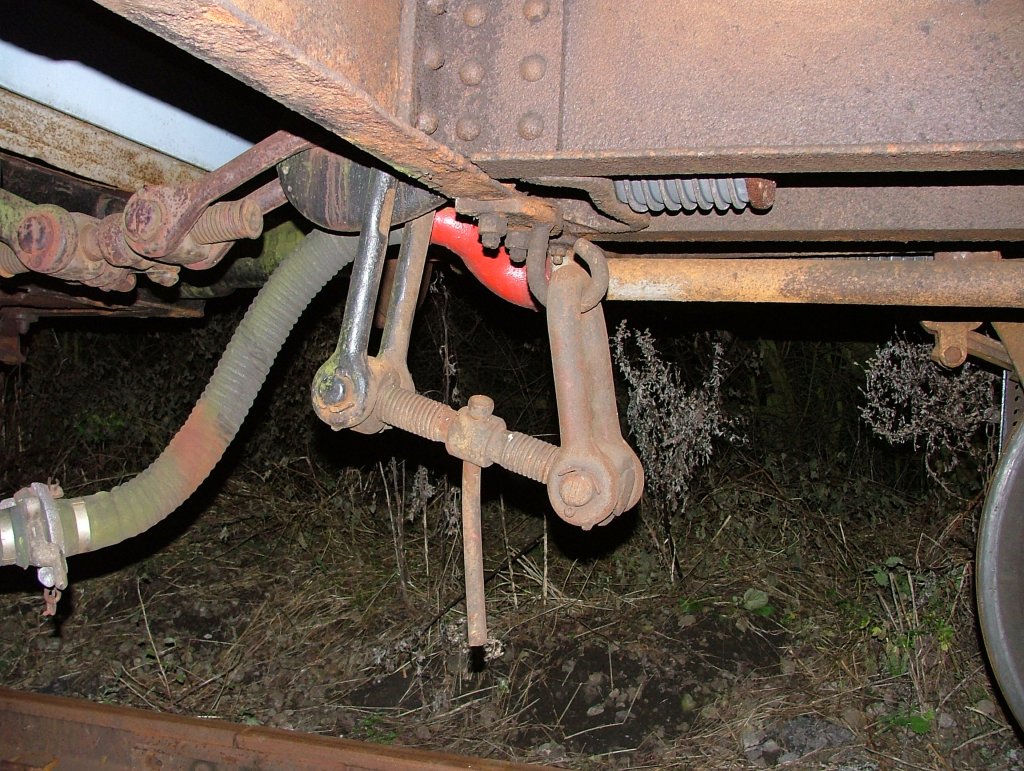
New vacuum pipework and fittings will also be required; this is
16T mineral wagon B596329 showing examples of the missing
components.
Photo © S. Sanders 16/01/05. |
 |
This batch of Palbricks were apparently built with screw couplings,
although B462772 has quite obviously had its instanters for many years.
The original type of coupling is seen here on B596329. As I only have
three instanters between two wagons, it makes sense to revert to screw
couplings on at least one of them.
Photo © S. Sanders 16/01/05 |
 |
One end and the floor need to be re-timbered (the end with the
tensioning screws remains semi-open), and new side stanchions need to
be manufactured. New plywood sides are also needed, by which time the
wagon should look something like B462073 as seen here in 1969. This,
however, is an example with the earlier underframe.
Photo © P.
Bartlett 04/69. Used with permission. |
Can you help?
There is still quite a bit to do. At the moment I'm looking for:
- Vacuum dummies and hoses.
- A couple of screw couplings.
- Any photographs of these wagons in service, particularly
examples from this particular batch in original condition; I've yet
to see such a photo.
- Any information on other survivors.
Return to index
© 2005-10 Phil
Hetherington
Last Modified: 19.01.10